Monday, May 7, 2007
Modifying the Xbox, Micro Xbox
Here is a comparison of my xbox and a regular sized xbox. Remember that everything was a tight fit squeezing bare pc board inside. So getting a xbox inside was definitely a challenge. Then entire cooling system was rerouted. Two fans added. The power button is removed so that the wires can be extended and power button installed in the dash somewhere nifty. The area where the fan use to be is only one inch tall now. Only a blower can fit into such a tight space. Also I removed the xbox logo since once it was installed it was upside down. The hole where the logo was serves as a nifty air vent, aiding heat dissipation from the massively modified cooling system. The side block is a squirl cage fan. Very quiet and moves arounf 30 cfm through a quater inch gap.
Inside Micro Xbox
Once a video card shored out on the video board I descided that it would be more economical to replace the board with a xbox. Since an xbox is a computer anyways. Here is the wiki Info
- Mobile Celeron (Pentium III Coppermine-based IA-32 CPU) Micro-PGA2 package. 180 nm process.
- SSE. Floating point SIMD. 4 single-precision floating point numbers per clock cycle.
- Resulting Gflops on cpu alone: 2.9Gflops
- MMX. Integer SIMD.
- 133 MHz 64-bit GTL+ front side bus to GPU/chipset.
- 32 KiB L1 cache. 128 KiB on-die L2 Advanced Transfer Cache (256-bit bus).
- SSE. Floating point SIMD. 4 single-precision floating point numbers per clock cycle.
- Shared memory subsystem
- Graphics processing unit (GPU) and system chipset: 233 MHz NV2A ASIC. Co-developed by Microsoft and NVIDIA.
- 4 pixel pipelines with 2 texture units each
- 932 megapixels/second (233 MHz x 4 pipelines), 1,864 megatexels/second (932 MP x 2 texture units) (peak)
- 115 million vertices/second, 125 million particles/second (peak)
- Peak triangle performance: 29,125,000 32 pixel triangles/sec raw or w. 2 textures and lit.
- 485,416 triangles a frame at 60fps
- 970,833 triangles a frame at 30fps
- 4 textures per pass, texture compression, full scene anti-aliasing (NV Quincunx, supersampling, multisampling)
- Bilinear, trilinear, and anisotropic texture filtering
- Similar to the NV20 and NV25 PC GPUs.
- Storage media
- Audio processor : NVIDIA MCPX (a.k.a. SoundStorm NVAPU)
- 64 3D channels (up to 256 stereo voices)
- HRTF Sensaura 3D enhancement
- MIDI DLS2 Support
- Monaural, Stereo, Dolby Surround, and Dolby Digital Live 5.1 audio output options
- Integrated 10/100BASE-TX Ethernet
- DVD movie playback
- A/V outputs: composite video, S-Video, component video, SCART, Optical Digital TOSLINK, and stereo RCA analog audio.
- Resolutions: 480i, 576i, 480p, 720p and 1080i.
- Controller Ports: 4 proprietary USB ports
- Weight: 3.86 kg (8.5 lb)
- Dimensions: 320 × 100 × 260 mm (12.5 × 4 × 10.5 in)
8 inch lcd frame fiberglassed
Here is the frame that I posted earlier. It now has had three layer of fiberglass applied. I used a different epoxy. I used a epoxy that is made by dap corp. This epoxy didnt give off violant fumes that stink up the area and give you a headache. My signifigant other discovered quickly that the cheaper general purpose fiberglass resin isnt real freindly to someone with asthma! :( Far warning spend extra :)
OKay I decide on a bigger Screen
I installed the 8 inch polaroid brand screen in Jessies car. It looked so much better than my 7 inch I jumped on the computer and found myself an identical screen to the on I used on her car. Here is the frame I have made. There isnt any fiberglass resin applied yet. If you ever do this be shure to get and imperfections or wrinkles out now! Once you apply the resin the shape you made is frozen forever. So be happy with it before you start opening chemicals. You will have alot less trouble with your project.
Cd Player Installed!!
Original bezel Finished!
This is a picture of the bezel after I hand molded it. Probably six hours of sanding and detail.. Makes you never want to do it agian. Then you do it anyway LOL This is before I realized I wanted to have a head unit with radio. The purpose of a headunit when you have a carputer it to have somthing to control volume, and the cd player has a biult in amp to power door speakers until I purchased my amplifiers.
Bezel progress
Carputer being completed screen
This was my first bezel. To make the you take the screen frame. Take the electronics out then glue the frame to the frame that fits in the car. There will be gaps between all the edges. I filled them in with bondo filler. The hardest possible way to do it. However it was my first time at this particular kind of project. I didnt have a cd player at this time. After the screen was put in, there wasnt an area for a cd player. So hence I had to make one LOL. I had to cut the ac controls out and mold in a bezel that comes with the cd players. That mad shure the edges were really sharp and clean. Cleaner than by hand.
Getting the plexiglass in
This is the plexiglass bottom. I precut the edges with a dremel. The edges are taped up with masking tape to help prevent fingerprints from sticking into the soft plexi after heating it. Letting it fully cool and then reheating only makes the plexi brittle. So one you start the process you cant stop! If you do the next time you heat it up you risk spliting the plexi. Right here everything it going well. The picture on the right is a top view through the windshield.
Forming Plexiglass
This is how you do it. Plexi wont bend at all till it hits around 350 degrees. You can make it hotter but it only makes things easier to mess up. WE heated our plexi maybe 20 times before we had the shape we wanted. Heat, Bend, Check then heat agian. Using card board to bend into the area you are trying to form the plexi too helps. If you can make th shape ot of somthing else first. Then lay the plexi on top. Heat the oven to 350 degrees then stick it in and watch! It will soften and begin to fall into the mold. Only let it get soft, if it liquifies then watever you are looking at through the plxi will look heavily distorted.
Plexiglass fitting
This is the first try at fitting the plexi into the dash. At this point I only made the top cover and it has much to go. I will post the bnding of the glass. Taking breaks here and there to check out well the curve is turning out was really important. Once you bend plexi you really cand bend it back much. The reason is to bend it back you must heat it up agian and because you are pulling agianst the curve you can split the plexi. Yeah It happened so pay attention and take your time. I took around 8 hours to do this.
Begining of the Carputer Install
This is after I managed to totally remove my airbag system. Much trimming away of usless plastic tabs was performed with a dremil. This is the first try at getting the board in. This board was purchased for 23 dollars from newegg online. Not the best but more economical. The precessor was pulled from a busted system. The heat sink is the original heatsink from the system pull. On the right there will be two 5.25 in cooling fans to move warm air away from the inside of the dash. The support in the center going across has 7 color led strip. Everything fit within a quater of an inch from rubbing the plexi. I am really glad. Fans and hardrives make some loud noises if they arnt insulated well.
Original Setup Carputer
This is my initial Test mockup. I knew I wanted somthing flashy that regardless of the stock interior really demanded awe from everyone who walked by. I spend around 70 dollars on the computer in this cars dash. The screen however was around 250. The screen was a 7 inch touch screen. This little guy was able to display impecable images and fast video ie. gaming without any crossing patch lines or jaggy edges. The motherboard was from newegg.com and made by PC Chips. The model was AN7/266. That is a AMD socket a processor and 266 FSB. I put in an AMD barton 2500+ Not the fasted computer now but far surpasses anything you could use (yes even gaming). I say this because This big factor that uses processing power is graphics. The screen is very small. So the required system effort is much less than that of a large 15-19 inch screen you would use at home. The computer took care of all navigation, Sorage or around 20 gigabytes of music and had a DVD player plugged directly to the computer at the floorboards edge. Out of the way of feet. Except that time my Girlfriend was jumping in the car and managed to kick back edge of the mount and scuff her pretty little 3 inch high hills. Oh how I miss those high hills. So now I coat things with texture spray or silicone to prevent cuts. In this picture I also shortened the shifter 2 inches. I did this so when my hand rests on the shifter, my fingers would be level with the touch screen :)
This setup was great. was navigation capable and could even remind me to get to work. The dash is covered with .25 in this plexiglass molded by hand. As well as the glove box being totally removed and also replaced with a clear cover. The bezel originally was made not out of fiberglass but polyester body filler. This is really hard so if your not a little artistic and have much patience, dont try it that way.
MIcrosoft Talon
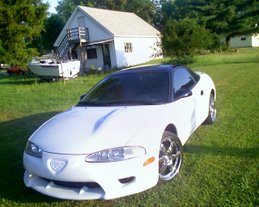
This is my 1997 Eagle Talon. I purchased the car in 2006 with very intention of doing somthing cool. Somthing different even. The first idea you have is to upgrade sound. I didnt have anything other that steel black rims on the car when it was purchased from a small used car dealership in East Ridge. In this blog I will explain how to make fiberglass creations ( or carbon fiber, the process is generally the same but is cosmetically different and when high end chemicals and materials are used its also stronger than fiberglass) . Many Options will be pointed out . Remember the best mods you can do to your car dont stand out. However A couple of well matched and/or blended custom editions to a cars interior can totally change your driving experience. Some of your mods can come from other cars you envy, or cars you dont envy but really enjoy or appreciate a feature of that vehicle. I am not out to make a firrari with my hobby car but a Starnes might be a good name LOL Okay on with the blog. I appreciate any input. Even if the input is bad it may spark a good idea!
Subscribe to:
Posts (Atom)